New Life For Used Truck Tires

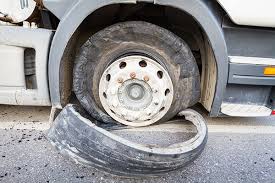
How Often Should Semi Truck Tires Be Replaced?

On any vehicle, there are certain systems, parts and components that need to be closely monitored and regularly cared for in order to ensure that drivers stay safe while on the road. Tires are responsible for your vehicle’s traction on the road, and they become much less effective as they age and wear out. Because of this, it’s important that you regularly inspect your tires, monitor their air pressure and replace them when necessary. The problem is that a lot of truck drivers and owners don’t know how often they should have their tires changed or what signs to look for to determine whether replacement is necessary.

Mileage guidelines

Because every truck is different, and each semi will carry different loads and drive in different road conditions, there isn’t a reliably consistent guideline for tire replacement. Though mechanics and automotive experts don’t have a replacement recommendation that can be applied to all trucks across the board, you can generally expect to get 100,000 miles of drive or more out of a set of semi tires in Florida, since they are designed to be rugged and durable. Ultimately, without a universally accepted replacement guideline, the best way to ensure your tires stay in the best condition possible is to get routine maintenance and inspections.

Looking for signs of wear

Just like with regular vehicle tires, you can check for excessive wear with the penny test. If you place the edge of a facedown penny into the tread of your tires, you shouldn’t be able to see the entirety of Lincoln’s face. In addition to the penny test, you can also look for visible signs of wear. Perform a visual inspection to check whether the tread wear indicators in your tires are visible.

Along with tire inspection and replacement, make sure that you keep balance and alignment in mind. Replacing tires on one side of your truck, but not the other, will likely result in uneven wear and could lead to major safety and operational issues.

To keep your tires in the best condition possible, you should take your semi truck in for regular service and routine maintenance. A trained and certified technician will be able to accurately assess the condition of your tires and take care of any necessary patches, rotations or replacements. They can also advise you on steps that you can take to keep your tires in good condition through safe driving practices and preventative maintenance for your tires.

Difference Between Symmetrical & Asymmetrical Tires

The ribbed patterns on a vehicle tire are known as the tread design. These patters are carefully thought out by the tire manufacturer to perform well under the tire’s anticipated operating conditions. The tread design may be symmetrical or asymmetrical in nature.

Symmetrical Tires

Symmetrical tires have a tread pattern that is the same across the inner and outer portions of the tire.

Asymmetrical Tires

Asymmetrical tires have a tread pattern that is different across the width of the tire. When looking at an asymmetrical tire the inner and outer tread patterns will not be the same.

Benefits of Symmetrical Tires

Most non-high-performance passenger vehicles will use symmetrical tires. Symmetrical tires are typically quiet and long lasting. Their tread patterns allow them to be rotated in many different ways, which substantially increases the life of the tire.

Benefits of Asymmetrical Tires

Asymmetrical tires are designed with vehicle performance in mind and are commonly found on sports cars. Asymmetrical tires have large blocks of tread on the outside to increase cornering stability and narrower blocks of tread along the inside of the tire to aid winter or wet weather driving.

Warning

When replacing a vehicle’s tires, never mix symmetrical and asymmetrical tires on the same vehicle. Mixing these two types of tires may cause the vehicle’s handling to become unstable, particularly in wet weather.

Best Options for a Lifted Truck

If you’re thinking about lifting or leveling, it sounds like you enjoy adding some personality to your truck. Why have it look like all the others? If you’re willing to get your hands greasy, consider these other options while you have your truck jacked up in the garage.

TIRES AND WHEELS

When you lift a truck, you open up your options. A factory-spec truck usually takes tires that measure up to 33 inches. A lifted truck can take tires up to 37 inches. Before proceeding, be sure to measure your old tires and the wheel wells, along with the distance between the tire and hard parts when the wheels are fully turned left and right. That way you can avoid having your new tires hitting the wheel well while you’re driving.

What’s the advantage of bigger tires? Obviously, there’s the jacked-up showroom look that many truck enthusiasts love. Also your truck will also go faster, since every revolution of the tire covers more ground. You may want to recalibrate your speedometer for exactly that reason. If you opt for wider tires, you may find you have better handling and performance. One slight disadvantage is that your fuel economy will suffer slightly because bigger tires add weight and rolling resistance.

ENGINE AND EXHAUST

If you’re lifting your truck for better off-roading, you also might consider upping your performance. A cold air intake pulls air from outside directly into your engine. Like fresh oxygen to a fire, this provides better combustion. That means the engine doesn’t work as hard, providing better horsepower and torque.

You can also try your hand at tuning your truck. Tuning means adjusting the settings on a truck’s electronic systems. Why do that? Factory settings don’t usually optimize performance or fuel economy. Manufacturers usually take a middle-of-the-road approach, programming the truck to have general appeal or meet government or company standards. When you tune, you can mold the truck to function the way you like by changing the electronic systems to your specifications, not anyone else’s.

SUSPENSION

When lifting, your hands will be on the suspension of your truck anyway. Let’s see what options you have there. If you want to enhance your off-road performance, you’ll be interested in installing some performance shocks. Leaf kits allow you gear your truck to off-road adventures, and purpose-built springs in the link system can help you change up the cushioning system to either get a stiffer or softer ride across various types of terrain.

DRIVETRAIN

If you notice more vibration after lifting your truck, you may have to replace your drivetrain. Your old U-joint-style driveshaft might need to be replaced with a double cardan or CV joint that can operate smoothly at higher angles.

ACCESSORIES

Here’s where your lifted truck gets really fun. When you’ve taken care of the logistics and made sure the guts of your lifted truck are in shape, look at accessories. Lifted trucks can add an extra layer of utility with things like lights (opt for light bars, strobes, square lamps, flood or spot to help you in the backwoods), winches (which can help you get out of some seriously sticky or sandy situations), and storage racks. Want to protect your undercarriage? Armor can help the rocks bounce off without damage.

TRUCK TIRE SIZES EXPLAINED

typically starts with a letter indicating the type and ends with a two-digit number, giving the rim size. Between these parts, you will see additional information about the tire size and construction.

1. TIRE TYPE

The first letter represents the type of vehicle you should install the tire on. P indicates a passenger vehicle or light-duty truck. Generally, these tires require lower pressures than other tires. LT designates a light-duty truck, but these often accompany larger 3/4 and one-ton pickups. If there is not a letter at the beginning, the tire is a Euro-Metric tire, usually used on passenger vehicles. In the example P235/75R15, the P means this tire fits onto a passenger vehicle.

2. SIDEWALL WIDTH

Look at the three numbers after the letter or the first three numbers in front of a slash mark if your tire does not have a letter at the beginning. These numbers give the measurement of the tire’s width from sidewall to sidewall in millimeters. Most tire measurements come from the metric system, regardless of the company making the tires. The example of P235/75R15 has a width of 235 millimeters between sidewalls.

3. ASPECT RATIO

After the slash mark, you will see a two-digit number. This value refers to the aspect ratio, which is the percentage of the sidewall’s height to its width. In the example tire, P235/75R15, the 75 is the aspect ratio. This tire’s sidewall height measures 75% of the width of the sidewall.

4. TIRE CONSTRUCTION

Following the aspect ratio, you will see one of three letters — R, B or D. This letter tells you about the tire’s construction. An R designates radial tires, which have their internal cords laid at 90-degree angles to the tire’s centerline.

Bias-ply tires have a D in this position to indicate their diagonal design. On these types of tires, the cords cross each other at 30 to 45-degree angles. While once common early in the 20th century, bias-ply tires no longer dominate the market. They have been replaced by longer-lasting, more comfortable radial tires.

Belted tires have a B to designate their format. These tires mix the diagonal design of bias-ply with added belts inside the construction. While rare, these have applications on some off-road trucks, trailers and antique vehicles.

For the example used, P235/75R15, the R means its construction is radial.

5. WHEEL DIAMETER

While the sidewall width uses millimeters, the wheel diameter, the last digits after the construction letter, comes in inches. The larger the number here, the larger the wheel size. If you replace your rims, you will also need to change the tires to fit. Be careful when changing wheel sizes because larger wheels affect the handling of the vehicle.

In the example tire, P235/75R15, the 15 at the end means you must install it on a 15-inch diameter wheel.

6. LOAD INDEX AND SPEED RATING

Following the size information, you will see two numbers and a letter. The numbers give the load rating for the tire, while the letter indicates the speed rating.

Using P215/65R15 85H as an example, the 85 gives the load index, also called the tire ply rating, and the H is for the speed rating, which tells you the maximum speed at which you should use the tires. This speed ranges from 3 mph to 186 mph.

HOW TO READ A TIRE

If you take a close look at a tire, you will find a large amount of information. Everything from the manufacturer’s name to the tire size and load rating appear on the sidewall. Interpreting these numbers requires you to know what values to look for and their meanings.

On the sidewall, you will find the tire’s type, the width, aspect ratio, construction, wheel rating, load index and speed rating. You can identify the values based on their position relative to each other and how many numbers or letters they have. The Tire and Rim Association standardizes these values for all American tire manufacturers.

Some tires may also have Uniform Tire Quality Grading, UTQG, which refers to information for traction and temperature grades. AA traction grades perform best in wet conditions, and the classes go down in performance — AA, A, B and C. Temperature categories refer to how well the tires dissipate heat at various speeds. Those rated with A perform well at speeds over 115 mph. B-rated tires operate best between 100 mph and 115 mph, while C tires remove heat best at speeds between 85 mph and 100 mph.

The first part to look for is the string of letters and numbers that may start with P, LT or no letter. For example, P235/75R15 or LT215/65R15. Manufacturers put a lot of information into this alpha-numeric code — the tire type, width, aspect ratio, construction and tire diameter.

Home Renovation Tips To Enhance Your Movie-Watching Experience

How can you improve curb appeal with exterior home renovations?

One of the best things you can do for your home is improve your curb appeal. It impresses the neighbours and increases the value of the property. Exterior home renovations don’t have to be complex and expensive, either. There are many things you can do to make the outside of your home and yard look better.

Decide if the external wall covering needs fixed up or renovated

Wood is the most common home siding in North America. Look over the wood carefully – you might even want to look at it from a distance with binoculars. Is a paint job, patching, and/or scraping necessary? Should the wood be replaced entirely?

Older homes may have artificial sidings that have been added on over the original shingles or clapboards. Consult with a renovator to find out if the original siding can be restored.

Install landscape lighting

Outdoor lighting serves many purposes. Its primary purpose is to light up the walking path to the door to make it easier to find your way to the home at night. Other ideal places for lighting to be installed include pool areas, patios, driveways, gardens, and architectural elements.  A good strategy is to put lights up all around the yard so that there are no dark spots when you look out of any window at night. However, you don’t want to go overboard with the lighting, as too much of it can hurt the eyes.

Make sure the front door is appealing

The focal point of a home’s front entry is the door. Either give it a new look with fresh paint and finish or have it replaced. You can get away with using a bright colour, since you will want it to look as warm and inviting as possible. Since it’s the focal point, it can’t be dull.

How Can I Prepare for a Home Renovation Consultation?

The first step toward completing a home renovation is requesting quotes from contractors who can help you get the word done properly. Especially if you are not very familiar with renovating and remodelling, this can be a daunting step. You can get the most out of your time speaking with a perspective contractor if you do your homework and a little bit of preparation first

Make a Plan

What are your goals for your home renovation? Are you going to be remodelling one room or transforming the entire house? You do not have to create detailed designs for your finished remodel, but it will be helpful to your contractor if you can describe which areas you will be renovating and the changes that you would like to make.

Determine a Schedule

Anyone who has ever been involved with a building project knows that it is laughable to expect every step to follow a precise schedule, but it is worthwhile to determine when you would like major aspects of your job to be completed. If it is important to you that your guest bathroom be finished before the holidays, this is something you should tell your contractor during your home renovation consultation. Remember to be realistic and flexible when it comes to scheduling expectations.

Take Measurements

One of the first pieces of information your potential contractor is going to want is the measurement of any areas being renovated. These measurements will be used to estimate materials and labour costs and you can save time by having them on hand. Before an estimate is provided, your contractor should take measurements personally, but for the sake of an informed initial home renovation consultation, it is good for you to already have these numbers.

Research Potential Contractors

Once you have this information ready, you can begin to look for contractors to hire. Do not limit yourself to the first contractor you find in your area. Do your research to find multiple contractors with extensive and relevant experience and a strong reputation in the community. By contacting multiple contractors for estimates, you can then find the company that not only has the strongest portfolio and history, but also one that provides you with a clear and reasonable estimate that plainly provides you with great value.

How Can a House Renovation Reduce My Utility Costs?

Utility costs have been steadily rising from year to year and this trend does not show signs of stopping. This is why many homeowners throughout have been looking for ways to make their homes more energy efficient. During the house renovation process, there are many changes that you can make to reduce the amount of energy it takes to run your home.

Improve the Insulation

Especially during cold winters, heating costs are generally the largest utility cost. Your heating equipment does not have to work as hard or run as frequently if your house is well insulated.

Seal the Building Envelope

Speaking of air barriers, you can further reduce your heating and air costs by sealing the building envelope. This means taking steps to eliminate areas where air can flow in and out of your house, such as gaps around windows and other areas where there are drafts.

Update Your Appliances

You can also cut your utility costs by upgrading to major appliances that require less energy to operate. This might include your washing machine, dryer, refrigerator, or dishwasher. These are obviously very large purchases and it will be a while before your utility savings allow you to see returns on this investment. It is likely best to wait to replace your appliances until they are in need of costlier repairs or they are clearly beginning to run quite inefficiently.

Replace old HVAC Equipment

The same rule applies to your HVAC equipment. Your heating and air conditioning systems may be operating more frequently not because the house is poorly insulated, but because the equipment is struggling to supply the temperature control that is needed.

Common Mistakes Made During DIY Home Renovation Projects

It is admirable – and sometimes quite fun – to decide to get your hands dirty and renovate your home on your own. It is very rewarding to not only have a remodelled home, but also to see and enjoy the fruits of your labour. However, especially if you are not trained in many facets of construction, home renovation projects can quickly spiral out of control and you could have a nightmare on your hands. Below are just a few examples of how DIY home renovation projects can go wrong.

Having Unrealistic Expectations

When you are working on your own home, it is easy to have tunnel vision and only think about the end result. This can mean taking on more tasks than you can handle, running out of funds, and/or having your project go unfinished much longer than anticipated. Before you ever start your project, it is necessary to have a specific and realistic design and budget in place before ever beginning any work. Allow yourself room for unexpected expenses as well.

Failing to Plan or Having a Plan that Fails

In addition to knowing what you are going to do, you need to know how you are going to do it, step by step. Many renovation projects must be completed in a certain order. If you go out of the necessary sequence, you may find yourself having to remove finished drywall, pull up new flooring, or otherwise backtrack in order to repair your misstep.

Using Inappropriate and/or Cheap Materials

One of the reasons you might choose to do DIY home renovations is to save money. Homeowners that do this will often be tempted to buy the cheapest materials possible. This can lead to using materials that are not right for a particular installation or using materials that are going to need to be repaired or replaced soon. It is important to do your research and know that you are getting a quality product and not just a good price.

Ignoring or Not Knowing Safety Procedures

When beginning to work, you might not have the safety goggles, gloves, kneepads, masks and other protective gear that is necessary for safely completing many DIY home renovation projects. You may not even be aware of the recommended precautions and gear for different activities. Failure to follow recommended safety procedures can lead to serious, potentially life-long injuries.

Before and After House Renovations – Room By Room

You might want to whip out the camera and take pictures before and after house renovations – the transformations are amazing. Looking at other homeowners’ before and after images is also a good idea, as you can get some inspiration of what you want done to your house.

The Kitchen

The kitchen is often considered to be the most important room, since it’s the one that every occupant visits several times throughout the day. For this reason, it should be where you spend most of your budget.  Tips include:

If there are small children in the house, keep the stovetop and oven away from the traffic areas. This way, you won’t have to worry about the kids running through and catching handles or causing spills. The refrigerator should be accessible to everyone.

Consider the countertops. If you cook frequently, you will need plenty of counter space. If you just prepare simple meals and don’t cook as often, you can get away with less counter space.

Invest in durable materials for your kitchen’s renovation. Since it receives so much traffic every day, high quality hardwood or porcelain is ideal for the flooring. You will also want fire and scratch resistant countertops.

The Bedroom

For bedrooms, comfort is the most important factor. Do whatever you need to do to enhance the level of comfort in each bedroom. Get new windows to eliminate stuffiness. Add better lighting fixtures if more illumination is required. If illumination is too bright, consider having a new lighting system is put in. Decide whether you want a hard floor with rugs or carpet. If anyone has allergy problems, use only hypoallergenic materials and make sure the quality of air is good in that particular bedroom.

The Living Room

There are so many ways to renovate and remodel a living room, no matter how big or small it is. When the ideal colours, furniture, wall art, and accessories come together, an amazing livable space is created.  If it’s too small for your liking, you can either add some space by knocking a wall down (if possible) or swap your existing furniture pieces for small, compact pieces.  An L-shaped sectional, for instance, can be situated in a corner, making it a better choice than a typical long couch. You could also get a flat screen TV panel mounted on the wall.

The Bathroom

Before you renovate your bathroom, have your plumbing checked out. Make sure your pipes and draining system are in good condition. Select durable, water-resistant flooring. Marble, ceramic, and stone tiles are all good choices. If you want to go with hardwood, make sure it’s well-sealed. Install an energy-efficient toilet and tub/shower. For larger bathrooms, install wall scones beside or over top of the mirror. For smaller bathrooms, consider having an open shower area that does not require a door or curtain.

Eco-Friendly Ways Of Unclogging A Clogged Toilet

How Do You Unclog a Drain?

One of the things parents dread hearing your child say: “The water’s not going down the drain!” You are totally repulsed. It’s going to be wet, and slimy, and probably smell bad, and, ugh, that’s not fun.

Clogged drains are just part of the joy of indoor plumbing. The good news is that you can troubleshoot the issues and prevent them from happening again, including chronic problems. But to get there, we’ll need to get into what causes drain clogs in the first place.

Common Causes & and Possible Fixes For Clogged Drains

Most bathroom drain clogs result when dirt, skin flakes, and especially hair binds to soap scum on the walls of drain pipes. Over time, this gunk accumulates and reduces water flow.

Troubleshooting: Remove and clean the drain stopper. Next, try using the humble drain plunger, keeping in mind to block the over-flow drain in the tub or sink. If that doesn’t work, remove the drain elbow joint and clean it out. Clean drain stoppers routinely to prevent clogs and use a hair strainer drain-cover to trap hair before it goes down the drain.

Clogged toilets are a nasty business. These mainly happen when people try flushing down items that do not dissolve or break apart in water such as:

feminine hygiene products

cotton-tipped swabs

dental floss

pre-moistened diaper wipes

Troubleshooting: The plunger is the first line of defense. The most effective plungers shoot jets of water to clear the drain pipe. Many have anti-microbial coatings. Next, use an inexpensive hand-powered drain auger. While not a pleasant experience, a hand auger can reach between 2 to 5 feet down the toilet’s drain pipe to break-up or retrieve things (such as Junior’s action figure) that are blocking the pipe.

Ways To Unclog A Toilet Without A Plunger Or A Snake

Are you currently experiencing a clogged toilet and have no plunger or a snake to help come save the day? Whether you just moved into a new place or haven’t made it down to you nearest Lowe’s yet, fear not. Believe it or not, there are actually multiple ways to unclog your toilet with common household items without having to get your hands dirty.

A Wire Coat Hanger

The first method you should try is the Wire Coat Hanger approach. For this you’re going to need to grab your nearest wire coat hanger and a rag. To unclog your toilet this way you’re first going to need to completely unwind the hanger until it is completely straight with the exception of the hook at the end. Next, completely wrap a rag around the hook end of the wire to prevent any scratching or minor damages to your commode. Finally, you will insert the hanger in toilet and gently rattle the hanger until you feel the obstruction has been moved.

Dish Soap And Half A Bucket Of Hot Water

If you don’t want to even bother getting your hands near your toilet (we don’t blame you), another alternative is to try to soften the obstruction. To do this grab a bucket of water and some dish soap. First squirt a bunch of the dish soap into the toilet bowl (chopped up pieces of bar soap will work as well). Next slowly pour a bucket of warm water into the toilet. Try to match the temperature of the water to something pretty hot but still would be drinkable, like hot coffee. Now all you have to do is wait until the water in toilet slowly goes down. If this has occurred then your clog has been taken care of. If not, repeat the process over again.

Baking Soda And Vinegar

This method is extremely similar to the dish soap and water method as described above. Once again, you will first need to gather your supplies which are: baking soda and vinegar. You should use an entire box of baking soda to ensure optimal success. Next, dump the baking soda in the toilet and then very slowly add vinegar. Allow the mixture to sit for a while and then flush your toilet. Your clog should be completely taken care of.

Drain Cleaning Chemicals

This method should only be used as a last resort as it can be the least effective and can cause harm to the environment. If you think that obstruction is not something that can be softened then avoid this method and call your local plumber instead.

How To Prevent And Unclog Toilet Blockages And Clogs

How to unclog toilet blockages is not on the top of anyone’s “to do” list, or “know how to do” list either. But when needed, it can be a simple task taking only minutes, or a complicated ordeal requiring a professional. As house cleanliness is an inseparable part of a healthy lifestyle, preventing and clearing a toilet clog is a big part of that. You can sweep a dirty floor, wipe clean a kitchen counter-top, and throw away spoiled foods, but you cannot always tell when your toilet is about to get clogged.

Let’s all admit a toilet clog is one of those things we go into denial about, especially when we hear those weird gurgling sounds. Let’s also admit that there are very few things more unpleasant and unsanitary that a water-backup from our toilet bowl.

Some causes of a clogged toilet

A clogged toilet ruins our floors, bathroom rugs, and puts a damper on the mood all around the house. If you are like most people, a clogged toilet is an almost inevitable occurrence in your house. There are times when somebody throws away something that doesn’t belong in your toilet, and flushes it down the bowl. For example toys, plastics, cigarette butts, cardboard toilet paper rolls, and what have you. Sometimes immediately, other times over time, those items will get stuck in your toilet, drain pipe, or somewhere in the S-bend or U-bend toilet trap. Even small objects, like Q-tips, which should go down as you flush, can stick to the pipe and build up a stubborn obstruction.

The most common culprit of is toilet paper, or an overused quantity of it. If you tend to use a lot of toilet paper, do not throw them all together at once and then flush, flushing twice is nice! The toilet has a better chance of flushing everything down the drain pipe when it is not overloaded with papers. Rolling any type of paper into balls does not help either. Another typical issue is sanitary napkins, which should go into the trash bin instead of a toilet. Children may try to flush their toys down the toilet just to see them swirl in a circular motion, then drown! It is probably fun for them, but not for you. You will end up with a clogged toilet, trying to figure out how to unclog toilet blockages.

Get a plunger

There are two different types of plungers: sink and toilet. Although you can probably use either for this purpose, the latter is designed specifically to work inside a toilet bowl. It has a rubber bell-shaped end to fit the bowl, allowing you to generate greater force to push down any obstruction in the S-bend or U-bend trap. A stiff rubber plunger that has been laying around for awhile can be hard to work with. So running hot water on the rubber end of the plunger to soften it up a little bit before you plunge can be a good idea. While you push the plunger in and out, always keep enough water in the bowl to cover the plunger. Without water in the bowl, the plunging action will not be forceful.

Ways to Unclog a Toilet When a Plunger Is Nowhere to Be Found

There’s probably no worse feeling than clogging a toilet – that is, unless there isn’t a plunger in sight. Most of us have been there before, we tend to use lots of toilet paper and sometimes the toilet just can’t handle the load. So, is there actually a way to unclog a toilet without a plunger? Find out below.

Dish Soap & Warm Water

Chances are you have some dish soap in the kitchen. Contrary to popular belief, you can use dish soap for more things than simply getting your dishes clean. In the event of a clogged toilet, squirt a generous amount into the bowl. Then add a gallon of very warm, but not boiling, water. Wait a few minutes and watch the combination of soap and water break up the toilet paper.

Coat Hanger

Have a wire coat hanger in the closet? Unravel it and use it to poke through the clog. Push the obstruction until it frees up and flows down the drain.

Baking Soda & Vinegar

Two more common household items come into play with this method. Pour 1 cup of baking soda into the bowl, followed by 1 cup of white vinegar. Wait a few minutes and then pour a gallon of warm water in.

Here’s How to Figure Out Why Your Toilet Keeps Clogging

When a toilet keeps clogging, there are several potential causes of this issue. What you flush down, problems with your drain lines, and issues with the toilet itself are all possibilities.

What’s to Blame When Your Toilet Keeps Clogging?

Frequent toilet clogs are a sign something is not right – the issue typically has to do with your plumbing, your toilet, or what goes down it. Common causes when a toilet keeps clogging include:

You have an older model low flow toilet

Items that shouldn’t be flushed have been flushed

Too much toilet paper use

The toilet trap is clogged

The toilet vent is blocked

Your sewer line is clogged

Older Low Flow Toilets

If your home is equipped with early model low flow toilets, the fixture itself could be the reason your toilet keeps clogging. Some older low flow toilets simply do not have the pressure needed to consistently push material through the trap and drain. Poor flushing pressure leaves material behind which results in constant clogs.

What to do:

Replacing your older low flow toilet is a sure-fire way to eliminate constant clogs caused by lack of flushing pressure. However, if replacement is not an option, reduce the amount of toilet paper you use and materials flushed to help prevent toilet clogs.

Flushing Non-Flushable Items

The only items meant to go down your toilets are human waste and toilet paper. When households begin to send other types of paper or hygiene products down with a flush, a toilet keeps clogging because it is not meant to dispose of these items.

Styles And Types Of Residential Roofing

Importance of Good Residential Roofing

When you think of your house’s best feature, does your roof come to mind? For many homeowners, roofing falls low on the priority list, and while many of us forget about it, the roof over our head is the most important aspect of any house. For homes in the development and those looking for a little facelift, a high-quality roof is a must. Your home’s roof has not only aesthetic value, but it also plays an important role in maintaining household health. Let’s take a look at what makes residential roofing in Albuquerque so important for any residence.

Protection from the Elements

If the role of a roof is to protect you and your belongings from the weather, it better be a good one! Having a poor roof can cause a number of headaches for homeowners, including annoying leaks that can turn into much more serious, and costly water damage problems. No one wants to deal with mold in their home, and once mold and mildew take over, your repair bill starts to climb. Good residential roofing in Albuquerque goes a long way in preventing harmful situations that can come from leaky roofing.

Promotes Energy Efficiency

Don’t let the warm air out! Many homeowners likely don’t think of their roof as an opportunity to save on energy bills, but a good roof will help keep your bills down by maintaining consistent temperatures. Consider how much heat is lost to a house from a worn-down roof with creaks and cracks here and there. It can add up quicker than you may think! Residential roofing in Albuquerque is a key player in maintaining an efficient and comfortable home.

Increases Property Value

If your roof is showing some serious wear and tear, the appeal of your house takes a nosedive. Worn down shingles and a lackluster appearance is not a good look for any home. Residential roofing is a major indicator of a property’s health. A good roof does wonders for the aesthetic of your home and can bump up your property value. While it may not be the first thing on the homeowner’s minds when they are assessing the appearance of their home, a well-maintained roof plays a key role in determining your house’s worth.

Sleep Easier with a Better Roof Over your Head

With a good roof over your head, you will sleep soundly at night, knowing you and your family are safe from storms, water damage, and a list of potential hazards. Investing in a good roof makes for an efficient household that will keep your heating bill down—and look great while doing it.

Important Reasons to Keep Your Roof in Good Shape

The roof is one of the most fundamental parts of a home. That’s why it’s surprising how often homeowners overlook the maintenance and care of their roof. Rather than waiting until you have major issues, have your roof routinely inspected by a professional roof repair company in Jacksonville. Here are top 6 reasons to keep your roof in good shape.

1. Weather Protection

If your roof is in poor condition, it can leave your home susceptible to considerable weather damage. When your roof is properly maintained, it will more effectively protect your home from the harsh weather and the elements.

2. Energy Efficiency & Comfort

A roof that is in top shape should have good insulation and a proper ventilation system which will keep your home’s indoor temperature steady. This helps to keep your home more comfortable and can significantly cut down on energy costs.

3. Serious Issues

By taking the time to maintain the health of your roof, you reduce the chance of potentially serious issues in the long run. It will also help you locate any small problems before they turn into larger, costlier issues. If you spot anything that could be a concern, it’s important to have a company that provides roof repair in Jacksonville take a look at it asap.

4. Curb Appeal

When your roof shows signs of wear and tear, it detracts from your home’s overall appearance.

Since a home’s roof is one of its most prominent features, one that is beautiful and well maintained will add great curb appeal.

5. Health Concerns

A leaking roof that goes ignored can cause mold and mildew to grow in your home, which can lead to some serious health issues. Once mold and mildew have spread, the repairs become much more complicated and costly.

6. Home Value

A good-looking roof is a selling point that increases a home’s value. Potential buyers are wary of buying a home that has an older roof or one that may need repairs. A roof that is in newer, well-maintained condition can significantly increase the value of your home.

The Importance of Proper Roofing Installation and Maintenance

The roofing of an establishment varies on different climates and the type of establishment that you have. For commercial establishments, they usually have flat roofs because it is the simplest roof to build; the simpler, the lesser it costs. The hip roof is commonly for residential houses; this roof has four slopes, which could be both square and rectangular in shape. On the other hand, an A-frame roof is commonly used for churches, cottages or other types of homes; this kind of roof serves as the roof and wall for the whole infrastructure. There are so many types of roofs. You can choose any of those for your house, but keep in mind the compatibility of the roof to your house.

Aside from having different types of roofs, the materials used for roofing also varies from the design of the roof and the kind of place that you live in.

Alike other things, the roof of your house or any establishment can also be damaged by certain causes like storms, cyclones, heavy rain and etc. If it is not attended properly, you might as well need to change the materials such as clay tiles, asphalt shingles, concrete tile, metal, slate, wood shingles or any type of roof that you have, and this will need an expensive cost. We want our roofing to last, so here are a few tips on proper installation and maintenance.

Find the Right Materials

When getting the right materials for your roof, you should invest on materials which can: last long, protect the house from natural disasters, not too heavy for the roof framing, should complement the style of the house or building and if it is allowed by local building codes.

Installing the Roof Deck Protection

It is best if you would hire a roof contractor. You cannot do this process by yourself, you’re going to need experienced and trained roof contractors for the proper installation of the roof. The roof deck protection prevents wind-driven rain from getting inside your shelter, another reason why you need it installed is so that your shingles would lay flat and neat.

Installing Leak Barriers

Your roof should have a leak barrier especially in the edges where it is prone to leakage. This should be done to reduce the risks of having your roof damaged.

Installing Shingles

It is important to nail your shingles in the right angle. Installing the first line of your roof shingles should be done with no error because it serves as the base of the other shingles that are to be installed. It should have a strong base to prevent it from being damaged when a storm comes.

Installing Flashing

Flashing is another material to protect the water from seeping into your roof. It is commonly placed on areas where it is prone to leakages like valleys and vent pipe.

What is a roof plan and why is it important?

A scaled drawing, or diagram, of a planned roof development, is called a roof plan. Your contractor will use your roof plan as a visual aid during the entire length of the project. A roof plan often includes the dimensions of the roof, which includes the design of the roof, its shape and size, and the material placement — vents, drains, valleys, and slopes, etc. When planning for new roof construction or repairs and renovations of an existing roof, the roof plan is crucial. Don’t be surprised if the plan changes as the project is underway.

To determine what needs to be done for your project and the materials needed, a roofing contractor will complete a survey of your roof. Small jobs only require a basic roof plan, which focuses on the roof shape and the material placement. On the other hand, larger jobs will use an architectural roof plan, which includes much more detail about the design and materials placement.

How to design your roof?

Many people only dream of designing a custom home, and you are ready to do just that! In order to design a successful building plan, you must take into consideration the things you need to do to comply with the law and the things that will make your home a comfortable place to live. You will need a footprint, a floor plan, schematics, and a roof design.

When designing your roof, you must consider the function of the roof —a protective barrier— not just what looks good. You must take your time in designing the roof of your home because it is an important protective barrier and oftentimes, it is more visible than the walls! You must fully understand the measurements of roof design as well as important information about the location of your property— climate and size. Follow these steps to design a roof for your home:

  • On your graphing paper, draw an exact replica of your home’s floor plan. You need to be extremely accurate with the measurements.
  • Next, identify the roof angles in relation to the vertical and horizontal rises from the structure to measure the pitch of the roof. Then, identify where the roof pitches come together and draw the intersections. Annotate where the run-off will happen with the ravines and slopes. Keep water run-off and melting snow away from your windows, doors, and walkways by directing them elsewhere. Your local hardware store will carry adjustable triangles that will help you plot your roof angles. These triangles will save you a lot of time because you won’t have to worry about measuring the rise and run on your own.
  • Include a variety of shapes with specific areas of your roof that may require a certain style. Some examples of styles used in residential roofing systems are A-frame, gambrel, gable, shed, and mansard. This is not an exhaustive list but does represent a majority used. Each style has features that are designed for various aspects of a roof —run-off, solar panel positioning, temperature control, and appearance. After you have decided the styles you need and their location, you are ready to draw the measured roof application.
  • From shingles to metal panels, include notes on the drawing about these various materials and details. The roof is an important part of your home’s visual appeal, so be sure to include your topical treatments in your plan as well.
  • Finally, you should have a professional draftsman assess your work, including your chosen measurements, styles, roof pitches, and finishes. A professional not only has experience designing roofs using detailed measurements but also has access to software to help check your calculations for accuracy. They can determine if your design will present problems for you, such as ice buildup, water and snow run-off problems, etc. Think of them as an editor for your roof plan.

Residential Painting Services

How Much Does It Cost to Hire a Painter?

A fresh coat of paint does not just give your home a brand new look. It also provides protection against pest damage and harsh weather, helps siding last longer, maintains structural integrity, and increases the resale value of your home. That said, painting is still a significant investment and requires a lot of careful consideration and planning in order to get the best results. From choosing the right color and finish for a room to buying painting supplies, there are a number of things you need to keep in mind before hiring a painter.

If you are planning to hire a painter to work on an exterior painting project, you are most likely to be charged a fixed rate, which is calculated on the basis of the square foot area to be covered. However, most painters charge by the hour for interior projects. Depending on the location, specific project, and season, labor costs around $40 to $60 per hour for a standard painting job. Painters in areas with a higher cost of living may charge up to $75 per hour.

Home Interior Painting Costs Per Project

Wondering how much you should expect to spend on different types of painting projects around the house? Check out the table below. All data given below is for a standard two-story home with 1,500 sq.ft. area and wood siding.

Home Exterior Painting Costs Per Project

An exterior paint job, whether just a touch-up or a whole house makeover, can improve your home’s appearance and value. Several variables affect the cost, namely, size, location, paint choice, and siding materials. The following cost table offers national averages for a variety of exterior components.

Painter Costs Per Hour

Labor costs for painting vary widely, depending on region, season, type of painting project, and experience level 2. On an average, you can expect to pay around $49 per hour for house painting projects. However, highly experienced painters can charge up to $70 per hour for specialty projects like murals. A 2,300 sq.ft. single-story home will require around three to five painters to paint the entire house and will take a minimum of five days to complete for a total cost of $2,400-$7,000. With new construction projects, unless you are acting as your own general contractor, painting costs will be slightly higher due to administration and hiring costs for the project manager or contractor. General contractors usually charge a markup of 10 to 25% on the total cost of a project.

Painter and Decorator

Painters and decorators apply decorative and protective finishes to interior and exterior walls, doors, windows and other surfaces of buildings.

Pay

Pay for painters and decorators varies depending on skills, experience and their employer.

Apprentice painters and decorators may start on the training minimum wage or the adult minimum wage, with their wages increasing as they gain experience and unit standards.

Unqualified or inexperienced painters and decorators usually start on about $20 and progress to $22 an hour.

Experienced painters and decorators can earn between $24 and $33 an hour

Painters and decorators running their own business may earn more than this, but their income will depend on the success of their business.

What you will do

Painters and decorators may do some or all of the following:

work with customers on colour selection and finishes

calculate materials required for a job

erect scaffolding under five metres high (scaffolding over this height must be put up by a registered scaffolder)

fill holes, cracks and joins, and clean surfaces of dust and dirt

mix and match paint colours

cut and hang wallpaper, vinyl and backing paper

apply paint and decorative paint finishes such as glazing, graining, marbling and lettering.

Skills and knowledge

Painters and decorators need to have:

a good understanding of colour

knowledge of paints and wall coverings

skill in painting and decorating techniques

knowledge of health and safety precautions.

Things to Know Before Painting

much time and money hunting for the perfect property, slogging through landlord or board approvals and paying for their space to turn cheapskate and cavalier on the interior paint job. So, before you even think about choosing between ochre with eggplant trim or Boomerang Beige–or the challenge of returning the red walls you envision for your rental to their original white–consider this advice from our expert panel.

Tip the super in advance About $50 to $100 should do the trick, for ensuring that the freight elevator is available when the painters arrive, helping with a quick cleanup if paint is accidentally spilled in a hallway, and maybe even looking the other way if the painters stay a little too late one day.

a general contractor, noting that your expectations will play a big role in your satisfaction with the outcome. Another compelling reason not to hire the super: If you’re unhappy with the final product or the super becomes disgruntled for whatever reason, you’re stuck with each other for a long time. 

Get detailed estimates If you’ve been in your apartment for at least three years, your landlord is required by law to get your apartment painted. If not, you’ll need to hire your own painters. Each estimate should be broken down by labor, materials, the number of coats of primer and paint, the brand and model of materials, and a detailed description of the amount of surface preparation that will be done.

Renter white Most rental apartments in New York are painted “antique white.” That’s important to know since renters are expected to return apartment walls to their original color or the landlord can withhold the appropriate portion of a renter’s security deposit. But with paint companies producing whole color wheels of whites of various tints, renters have design choices they may not have to cover up when they leave.

Residential Painting Service

residential painting service

do interior and exterior painting services in the area. are the residential painting service on the rise in area. interior painting is very detailed. take tremendous pride in our work. really love to see customers happy faces as we do quality work. painters are some of the best in profession. find really good painters and help them get better. residential painting service is guaranteed to please even the most particular of customers.

If you want to hire a higher level company then are the ones to call. are Straight Edge Painting and are fast becoming one of the most trusted painting contractors. residential painting service is growing fast.  I know that the type of service you hire will determine how long and how beautiful your painting turns out. service included interior and exterior painting, pressure washing and wallpaper removal. do some drywall patches and fixes also. don’t really do a lot of new drywall instalations and do know how

Interior Painters agree that interior painting is mainly used for beautifying the home and picking the right color scheme for spaces requires a certain amount of imagination and creativity. Simply thinking about what color would look best on a wall isn’t enough to ensure a positive paint job. Virtually any color will look good on a surface as long as it is applied correctly, but choosing the right color involves looking at an interior space with a critical eye in regards to your own unique taste.

The easiest way to choose a color scheme is to look through color catalogues or at paint samples. Most hardware stores and paint depots keep catalogs handy for customers to take home. Homeowners and those of you that call yourselves Interior Painters should take their time looking at the spaces in these catalogs and comparing colors to their existing floors, carpets, curtains, blinds, furniture and decorations. It’s important to look at fabric and upholstery first and then look at the other aspects to see if they coordinate with your color choices. Consider the prominent color in this coordination for the walls.

Once you’ve picked the perfect color, you still have to decide on what type of paint you want for the space. Whether you’re looking for an elegant, refined finish or a material that will wipe clean after an impromptu mural from your little one, there are paint types to suite every situation

Strategies to Grow Your Painting Business Year Round

Painting contractors can plan ahead and use these customer-focused strategies to increase the number of job wins you get throughout the whole year. A successful painting business focuses on exactly what the customer needs

Successful painting business strategies

The paint can flow all year-round with customer focused strategies. Consider tips to maximize the jobs you get. Painting may not be as seasonal as some businesses. Still, there are times during the year when the paint dries little slower. That’s where the challenge remains for contractor clients and why love finding out what makes their sales process thrive during such times.

Keep the painting leads flowing in

Painting contractors that are growing their business make sure they do a few key things to keep the leads flowing in. Let’s consider two scenarios in the painting industry today. First, there will be painting jobs available all year round but it just depends what type of job.  Due to the season, some jobs will be indoor and others will be outdoor jobs. Second, homeowners will always be viable leads. Homeowners will start thinking about how they want their house to look long before they decide they need a painter and when they might want that new paint job completed — also dependent on the season in your area.

tips to help you run a painting business

Once you know what kind of business a season holds in store, you’ll need to hone in on how you approach, market, and deal with customers. Put some thought into this to truly build a customer-centric painting business.

Wrangle your customer list.

Arguably the single biggest difference between businesses that make it and those that don’t is how they keep track of their customers. Juggling your contacts with your inbox and by text message may work when you have five contacts that you’re working with, but it’ll never do when you have 20, let alone 200.

Benefits Of Carpet Flooring In Your Home

How do I disinfect my carpet?

Your home’s carpet may be harboring harmful bacteria, germs and allergens without you even realizing it. Here are four simple steps to help keep the carpet in your home clean:

  • Place doormats at every entrance of your home and instill a strict “no shoes” policy indoors. Shoes worn outside can track in residue from asphalt, pet droppings and dirt. Wiping the bottom of shoes with a disinfectant occasionally can also help reduce contamination.
  • Vacuum carpets and area rugs several times a week, and if you have an infant or toddlers, daily vacuuming is recommended. The vacuum can remove surface debris easily.
  • You can naturally disinfect your carpet using products you may already have at home, according to Green America. They published 10 Simple Ways to Clean Green and shared a recipe including baking soda, Borax and cornmeal.
  • Hire a professional service to provide a deep, steam cleaning at least once per year and more often if you have pets, parties or little ones.

How to Sanitize Carpets

Vacuum cleaners are effective in removing dust and loose crumbs that accumulate on the carpet. While a vacuum works well in day-to-day cleaning of the carpeting, it does not sanitize. This means that although the carpet is free of dirt and crumbs, it is not free of bacteria. You must occasionally incorporate a disinfectant routine that kills any dirt or bacteria present in the carpet.

Step 1

Pour about 2 cups white vinegar into a spray bottle and lightly mist over your carpet. Vinegar is a natural disinfectant safe for use on carpets. Let the vinegar air dry. Remember to mist only; you don’t want to over-saturate your carpeting.

Step 2

Steam clean for an even deeper cleaning that will sanitize thoroughly. Fill the fluid compartment with one part white vinegar to three parts water.

Step 3

Plug in the steam cleaner, let it heat up for a few minutes and push across the carpeting. Push the steam trigger every 30 seconds or so to shoot out a blast of steam. The steam power mixed with the vinegar will provide a deep cleaning that will sanitize the carpet quickly.

Step 4

Let the carpet air dry after steam cleaning.

How to Disinfect Washable Carpets

Small carpets that can be tossed in the washer can be disinfected easily.

  • Remove Loose Debris

Take the carpet outside and give it a good shake or vacuum well to remove loose debris.

  • Select the Washer Settings

A front-loading washer or a top-load model without a center agitator will accommodate a large carpet better than a standard top load washer. It may be worth your time to head to a laundromat that has larger washers. Choose the hottest water recommended for the carpet on the care label.

  • Add Detergent and Laundry Sanitizer

A heavy-duty laundry detergent contains enough enzymes to cut through grime. Add a laundry disinfectant like Lysol Laundry Sanitizer, pine oil, or chlorine bleach following product directions.

  • Dry the Carpet

If the carpet is 100% cotton and does not have a rubber backing, tumble dry on high heat. If the carpet cannot withstand high heat, allow the carpet to air dry.

Vinegar Cleaning Without Steam Power

A mixture easy to prepare might help you to disinfect your carpet quickly as an alternative other than a steam cleaner.

Vacuum cleaners work for daily using and they are successful for it but we need another formula to sanitize our carpets and make them free of bacteria.

In this section, I will mention some mixtures with white vinegar that will help you to kill ant dirt or bacteria on the carpet and you will not need any steam cleaner at the same time.

You will not have not only cleaner and free of bacteria carpet, but also an amazing workout without spending more money.

Your mixture should contain equal parts of cold water, white vinegar, and a little bit of liquid dish detergent. Apart from these, you will need also a bucket, a scrub brush, and an old rag.

Here are 6 steps to disinfect your carpet with this mixture:

  • Your carpet should be removed from all irrelevant pieces of stuffs. After removing all the furniture off, it is time to vacuum to remove germs and dirt that can not be seen with naked eyes.Now, you need to sprinkle the carpet with the baking soda and keep it here about five minutes. You can use this time to make your mixture. Stir it until you see a foamy consistency. You will see in the end how successful these ingredients are with their cleaning properties.
  • Take your bucket and add the ingredients one by one. It should include equal parts of cold water, white vinegar, and a little bit of liquid dish soap. I do not recommend you to prefer delicate fabrics made from organic materials such as wool or silk rugs.
  • This part is probably the most trying part. After dipping your scrubbing brush in the foamy mixture, it is time to scrub your floor. You should get it wet just at an optimum level. It is enough to get a little bit wet, not saturating the area. It would be better if you start from one of the corners of the carpet and continue through the other corner of the carpet. When needed, you should dip your scrubbing brush again in the foamy mixture. When you are done, you should wait for more than five minutes. After that, you will realize the differences!
  • To rinse your carpet, you will take a rag and dip it cold freshwater. The dirt and bacteria now inside mixture will be removed. The rota you used when scrubbing again will be same for the one of rinsing. When needed, you should again make suck the rag. You can change it if you feel like it does not work anymore.
  • If you have a chance, you can let your carpet dry with a fan or any other device. Yet, for every condition, it is better to do this process on a dry day or on a low humidity.
  • Now you can vacuum the carpet to clean from the mixture that might be left a little bit. After it, now you are done without using any other things outside your home.

Takeaways

  • The best way to disinfect your carpet is by using a steam cleaner and white vinegar.
  • If you don’t have access to a steam cleaner, you can still use household products to sanitise your carpet.
  • Borax and baking soda can help you perform a deeper clean of your rugs.
  • No matter the cleaning method, always do a test on a hidden area first.

Get Kitchen Remodeling Ideas

Lessons Learned: How NOT to Handle a Kitchen Remodel

Experienced remodelers and more than a few homeowners can tell some horror stories about unreliable contractors who walked out in the middle of a job or failed to complete the work as planned.

Make a Plan—And Stick To It

The most fun part of a kitchen remodel is the planning stage, right? Picking color schemes, imagining what your new countertops will look like, visualizing all the additional space you’ll have … But it’s important to make a plan and stick to it.

Consider Hiring a Designer

Hiring a professional kitchen designer/decorator might be the best way to come up with a remodeling plan you can stick to. An experienced decorator can help you achieve your creative vision without getting sidetracked. He or she can save you time and money by avoiding problems that come up because they see those problems on a regular basis.

Decide on a Budget

Part of coming up with a plan is coming up with a realistic budget—and sticking to it. Many homeowners start out with visions of a glorious new cooking or dining space. As with many things in life, too many people have Champagne dreams and a Bud Light budget.

Think About How You Will Use Your Kitchen

The plan you and your designer/decorator will implement will be based on your goals and what you want from your new kitchen. Think about your family and your lifestyle and plan your kitchen remodel accordingly.

Smart Strategies for Kitchen Remodeling

Homeowners spend more money on kitchen remodeling than on any other home improvement project. And with good reason: Kitchens are the hub of home life and a source of pride.

A significant portion of kitchen remodeling costs may be recovered by the value the project brings to your home. A complete kitchen renovation with a national median cost of $65,000 recovers about 62% of the initial project cost at the home’s resale

Plan, Plan, Plan

Planning your kitchen remodel should take more time than the actual construction. If you plan well, the amount of time you’re inconvenienced by construction mayhem will be minimized. Plus, you’re more likely to stay on budget.

Some tips on planning:

Study your existing kitchen: How wide is the doorway into your kitchen? It’s a common mistake many homeowners make: Buying the extra-large fridge only to find they can’t get it in the doorway.To avoid mistakes like this, create a drawing of your kitchen with measurements for doorways, walkways, counters, etc. And don’t forget height, too.

Think about traffic patterns: Work aisles should be a minimum of 42 inches wide and at least 48 inches wide for households with multiple cooks.

Design with ergonomics in mind: Drawers or pull-out shelves in base cabinets; counter heights that can adjust up or down; a wall oven instead of a range: These are all features that make a kitchen accessible to everyone — and a pleasure to work in.

Plan for the unforeseeable: Even if you’ve planned down to the number of nails you’ll need in your remodel, expect the unexpected. Build in a little leeway for completing the remodel. Want it done by Thanksgiving? Then plan to be done before Halloween.

Choose all your fixtures and materials before starting: Contractors will be able to make more accurate bids, and you’ll lessen the risk of delays because of back orders.

Don’t be afraid to seek help: A professional designer can simplify your kitchen remodel. Pros help make style decisions, foresee potential problems, and schedule contractors. Expect fees around $50 to $150 per hour, or 5% to 15% of the total cost of the project.

Get Real About Appliances

It’s easy to get carried away when planning your new kitchen. A six-burner commercial-grade range and luxury-brand refrigerator may make eye-catching centerpieces, but they may not fit your cooking needs or lifestyle

Kitchen Cabinets or Appliances: Which Do You Buy First?

While you’re remodeling your kitchen, one of the things you’ll be surprised by is how quickly you run out of space. Countertops alone can eat up a lot of real estate – then you have to decide whether you should buy kitchen cabinets or appliances first.

There are pros and cons to both. Here’s a quick checklist of points to consider:

If functionality is the most important part of your kitchen, buy appliances first.

If you’re remodeling your kitchen for style and spaciousness, buy cabinets first.

Either way, measure twice so you only have to buy once.

Your kitchen layout is everything

Moving gas lines, rerouting electrical outlets, and extending water lines is a quick way to jack up the price of a kitchen remodel. “Big” appliances can also anchor the room, so it’s important to envision the flow of the room when deciding where they belong.

When it makes sense to pick appliances first

Think about it: The whole reason you even have a kitchen is to prepare, eat, and store food with various appliances. That can make it tempting to choose the appliances first during a remodel and build cabinets around them.

When it makes sense to buy kitchen cabinets first

Some designers see kitchen cabinets as the focal point of the kitchen because they often last longer than appliances. Cabinets also come in an array of styles, colors, and finishes that can make or break the tone of your kitchen.

Things to Consider Before Planning for a Full Kitchen Renovation

The kitchen ought to mirror your way of life. It accommodates your cooking needs, give the sort of space you requirement for feasting and offer a lot of storage. Its stylistic layout should supplement your home’s architecture and established the pace for gatherings that happen there. A great deal of factors play into kitchen plan, yet the initial step before picking appliances or visiting a cabinet showroom is to define a few goals for your space. However, there are certain things to consider before planning for a full kitchen renovation. Below are some of them.

Budget

Weighing out the expenses of a redesign is, without a doubt, the most daunting task in the undertaking. Therefore, it’s the one you should tackle first. Another kitchen can be a major cost, so first consider your spending when choosing how enormous you want to go. Enrol the assistance of a local realtor for advice on the added value your undertaking will add to your home. Study your favourite kitchen and redesigning magazines and sites for planning insights. And investigate a home value loan for a major endeavour, or financing choices for updating cabinetry and appliances (many offer zero enthusiasm for a half year to a year). At that point, investigate ways to save cash by doing a portion of the work yourself or giving your cabinets a facelift, rather than purchasing new ones.

Size

Every last bit of space is important, especially in a small kitchen. The size of your kitchen will dictate the layout: Is there space for an island? Does space allow for a prep sink? Where can you crush in extra storage?

Existing Layout

Try not to feel married to your kitchen’s current impression. Windows and entryways are only occasionally in the place you want them. They may be on an inappropriate wall, or in an inappropriate place altogether. If you should maintain the windows/entryways of your kitchen, you may be secured to your layout—yet there are always ways to change. For instance, you can add a peninsula to a L-shaped kitchen and create a horseshoe layout that offers all the more counter space and proficiency. Learn about various kitchen layouts.

Infrastructure

Contingent upon the age of your kitchen, you may stand up to electrical or plumbing worries as you redesign. Work with an architect-engineer team to guarantee that the “guts” of your kitchen can accommodate the innovation (appliances, lighting, and so forth.) you will install.

kitchen renovation mistakes

Not planning kitchen layout

Even if you’re going to fit the kitchen yourself, it’s a wise idea to have your home kitchen remodelling plans checked by a kitchen designer before you start. Advice from a professional will be very helpful. They may have some time saving tips or recommend some ideas you hadn’t thought of.

Make sure there’s enough space to walk between the units and that the cupboard handles don’t interfere with the walkway. Place the oven, sink and fridge carefully: many designers refer to this as the kitchen ‘work triangle,’ as the most efficient way to position these is in a triangle shape.

Choose any new appliances first, especially large integral appliances such as ovens, fridges etc. It’s easier to buy units that fit around the appliances than try to buy appliances that fit in the units’ spaces. Fit drawers or shelves with appropriate storage spaces for integral rubbish bins, recycling bins, cleaning equipment and all the other easily forgotten, but essential equipment.

Moving plumbing

Unless you have decided to remodel the kitchen entirely, it saves time and money if your new kitchen layout has the sink, washing machine and dishwasher in the same positions as before, to avoid having to move the plumbing.

Not installing enough lighting

Kitchen designers recommend installing three types of kitchen lighting during a new kitchen installation:

Overhead for general illumination.

Spot lighting to light up specific areas where you perform tasks, such as over the kitchen island and over the sink.

Accent lighting to highlight the best designed features in your kitchen, such as under cabinet track lighting to highlight the work surface and splashback.

Planning For Packing Services

PACKING SERVICES

Packing made easy!

Are you dreading to have to pack your belongings? Yes, packing and unpacking can be a quite strenuous ordeal and customers often underestimate the time and energy that are required to do it properly, but you don’t have to do it yourself.

experienced and fastidious movers and packers are highly skilled to pack items of any quantity, value, or fragility, from a cabinet of heavy pots and pans to your finest crystal.

Which packing solution fits your needs?

Full packing service

Leave it all. moving professionals are trained at very own facilities, and they know just about everything there is to know about packing, loading and moving. meticulously wrap each item and provide you with an inventoried list of everything you’re moving, to help keep track of all of your belongings. Before pack or move any item, will protect your property covering surfaces like carpets, doors, and door jambs in both your old and new homes.

Fragile only

Perhaps you have some antique heirlooms, priceless art and décor, or some fragile knickknacks that are close to your heart?

Do-It-Yourself (DIY) packing

Are determined to do it yourself? No problem, Moving and Storage Services will provide you with all the packing materials you need, such as boxes, tape, and protective wrap, and leave all the packing up to you.

How Much Do Professional Packers Cost?

Packing Services Cost

The cost to pack a home ranges from $270 to $2,200, with an average of $1,000. This total includes materials and labor to pack boxes and furniture. Hiring a pro to pack and unpack runs $370 to $3,600.

Moving between homes can be tedious. Packing takes a lot of time and might damage your belongings if you’re not careful. Hiring a service saves time and lets you focus on other aspects related to moving. Here are several price factors you’ll want to consider as you prepare.

Professional Packers Cost

The $270 to $2,200 cost to hire professional packers relates to the number of bedrooms and the total square feet.

Packing Service Cost by Home Size

Packing costs average $1,000, depending on the size of your home. The average price by the number of bedrooms is:

1 bedroom: $400

2 bedrooms: $725

3 bedrooms: $1,500

Keep in mind that square footage determines the total as much as the number of rooms. If you have a two-bedroom house that is 1,500 square feet, you’ll pay $1,000 to $2,200.

Cost to Pack a House by the Hour

At $50 to $120 per hour for labor, the rate you pay depends on the number of hours you need for the job:

400 to 1,250 square feet: 2 to 5 hours.

1,250+ square feet: 6 to 12 hours.

The total price per hour depends on the number of packers. If you schedule three pros instead of two, usually for 3+ bedrooms, you’ll pay a higher hourly rate.

Packaging  Your Items with Professional Packing Services

Packing services are a great choice and value for any client looking to have a fast and efficient move. This level of moving service will make sure you have a hands free move that will keep your stress low while getting a good value. Automating your service is a great choice and can result in a easy and stress free move

Packing Services Can Make Moving Fast and Easy

Anyone who has moved before knows well, packing is one of the most tedious parts to the moving process. professional packers will make sure your belongings are properly protected and secured to avoid any potential damage. packers and movers are well trained by our veterans to make sure all of your kitchenware and electronics are properly packed.

All Packing Supplies and Equipment Are Free of Charge

will make sure to send the packers and movers with enough boxes, tape, and packaging paper to pack any and every valuable possession that you own. All supplies and equipment are included at no additional cost with the purchase of services. can make sure your move is handled right from start to finish with professional grade supplies and equipment at no additional costs.

Removal Packing Services

The safety of your belongings starts from the packing. Planning and preparation are important to efficient and successful move. Many removalists offer packing and unpacking services. This will remove the stress in packing and organising and will also save you a lot of time doing the arduous tasks. You can also take advantage of the removalists’ expertise in packing for moving. However, you also have the option to self-pack.

One Month Before Move

Booked with movers. Shop around and choose the moving company that can address all your moving needs. Be on the lookout for hidden charges and the cheapest isn’t always your best choice.

Decided whether to let the removalists pack or do the packing yourself.

If you are doing the packing, you should start researching and learning how to pack for moving.

Bought initial packing supplies.

Started decluttering and organising the things to pack, sell, donate or discard.

Started packing items for storage.

Hold your first garage sale.

Two Weeks Before Move

Bought all required packing supplies.

Shipped boxes for storage.

Start packing non-essentials. Extra beddings, kitchen implements not being used, personal collections, extra clothes and toys.

Cleaned out your pantry, cabinets and closets.

Taken down wall décors, boxed fragile tableware and other non-essential kitchen items.

Hold your final garage sale.

Donate or discard all items you will not be bringing with you.

One Week Before Move

Organise and pack outdoor items – lawnmowers, garden implements and other equipment. Give away potted plants you will not be bringing with you.

Boxed all non-essentials.

Start sealing boxes of non-essentials and rarely-used items.

Marked the boxes. Colour coding the boxes will make it easier for you to unpack.

Three Days Before Move

Confirmed booking with the removalist. Confirm the time they will be arriving, the names of the moving crew and ask if there’s anything you need to prepare for them.

Boxed everything, leaving one open for the essentials that you’re still using.

Emptied freezers. Unplug and clean all appliances. Box those that you will be bringing into your new home.

Marked all the boxes.

Identified items that will travel with you like jewellery, important documents, two sets of clothes for each member of the family, medicines, formula, electronic items and their respective accessories, some toys for the children and other essentials.

One Day Before Move

Have all boxes sealed and marked.

Have everything ready for the movers.

Packed the items and bags that will be travelling with you.

Cash ready for travel expenses.

PACKING SERVICES

Movers offers packing services that can be customized to meet your specific needs, regardless of your home size. Packing is arguably the most difficult (or at least the most boring) part of moving. The time that it takes to pack your items can be very overwhelming. If you either don’t have the time or simply don’t feel like doing it yourself, can provide the packing materials and professional movers and packers to assist with your packing needs

Full Pack

If you would rather not pack anything at all, can send packing team to your home to pack up everything from the garage to the kitchen. A full pack service is almost always done a day before the move itself, as it can take quite some time depending on the size and/or contents of your home. can leave out any items you may need the night before the move, and can quickly pack those up on the day of your move.

Partial Pack

This is the most popular option that customers select. This allows you to keep costs down by doing some of the “easier” packing yourself. If you don’t mind packing some of your items on your own, but decide you need help with the fragile or more difficult items, happy to help. team of packers will bring out a variety of boxes to pack what is needed. You are only charged for the boxes that are used to pack your items.

For liability and safety reasons, we will not pack or transport any of the following items:

Jewelry

Medication

Cash

Important personal papers (deeds, wills, etc.)

Firearms

Perishable foods

Cleaning supplies/chemicals

Paints and paint thinners

Gasoline and other flammable liquids

How To Become A Professional Wedding Photographer

How do wedding photographers get customers?

You love photography and nothing would feed your soul more than having a calendar booked with fresh clients every week.

The only problem? You’re not sure how to attract enough clients to stay booked up. That’s why, in this post, we’ll explore 17 creative ways to get more wedding photography clients…offline. Some of these strategies I’ve seen successful photographers use in their business and it made me wonder “Why didn’t I think of that?”

Some have been proven to work by other wedding professionals, which could easily be adapted for photographers. Others are unusual tactics that I haven’t seen used before, which leaves a big fat opening for you to swoop in and make them yours.

Here’s a Quick Summary of How to Get More Wedding Photography Bookings

Charm Your Way into Preferred Vendor Lists

As a photographer, one of your best sources for quick clients is referrals. And, naturally, venues can be one of the best sources of referrals since they are often the first wedding business couples meet with.

But how can you get your foot in the door with venues who already have a list of favorite photographers?

Whether its a venue you’ve shot at in the past or not, you can create a prime opportunity to get your name in front of them, if you approach it with their best interests in mind first.

  • Make a list of the top 10-20 venues you feel your ideal client is most likely to host at. Get creative too by exploring unconventional or converted spaces, like lofts, museums, galleries, botanical gardens and barns too.
  • Get on the phone and reach out to the Events Manager. Let him or her know that their venue seems to be a favorite among your clients and you’d love to drop by sometime to meet the staff on a slow day. Tell them you always have your equipment with you anyway, so you’d be more than happy to take fresh headshots of the team and any property images they want to update, complimentary, while you’re there.
  • Set aside plenty of time that day, so you won’t feel rushed and come with business cards and a giveaway portfolio they can keep on hand, if they ask for one.
  • Don’t push for referrals or directly ask to be on their preferred vendor list. If they like you, they’ll probably offer. If they don’t mention it, ask them if they have a preferred vendor list and leave it at that. Let them make the offer.
  • Follow up, follow up, follow up. Whether you’re on their list or not, staying front of mind and letting them know you care is key to growing the relationship. Remember, they want to be promoted too. So let them know when you’ve referred clients their way or when you have a wedding on the books for their venue.  And if you don’t have client crossover yet, then try some of the fun gift drop tactics from this post to stay on their radar.

Partner for Prospects

Your peers don’t have to be your competitors if you choose not to look at it that way. Instead, they can be one of your top source of client referrals.

Whether you’re a fan or not, Jasmine Star has had tremendous success as a wedding photographer and, for that reason alone, I think her tips are worth listening too. I truly admire her perspective on peer-partnering.

In this video, she reveals how partnering up with other local photographers grew her business faster than she ever thought possible. They swapped leads and gave each other overflow work when booked up for that date.

Perfect your listening skills

Let’s go back to the beginning. After all, that’s where the first impressions are made. You can get referrals from clients who haven’t even paid their deposit yet. Be prompt, be polite, and be consistent. The clients already love your work, so now you need to get them to love you too! Listen to them. People want to be heard. They do not care how many weddings you’ve shot, they only need to know that you care about theirs.

Don’t let your own prejudices stand in the way. We all have opinions and when a couple gives me a list of group shots that are as long as my arm, I cry inside. I know they’re not going to actually want that many, I know they’ve booked me to document the actual day, and I also know that if I don’t accommodate the request then I’m not going to live up to their expectations.

This is where you need to be prompt, polite, and consistent. Thank them for the list, don’t reject it. Give them some ideas that work around how you shoot and explain to them the reason you’re offering these ideas.

Be transparent

Assumption makes an… well, you know the phrase. Does your client know that unless they actually spend time with Uncle Roger during the wedding shoot, there won’t be any photos of them together? Does your client know you’re completely unreachable when you’re shooting a wedding? Give your clients an FAQ pdf when they book or make everything clear when you meet them. Better yet, do both.

Word of Mouth Referrals

Although forms of communication have evolved over time, there is nothing people trust more than a recommendation from a good friend. If you are wondering how to get more wedding clients, credibility is key no matter what choice of lead generation you look at.

Advertising on Social Media

The E-commerce space created the necessity for online ads and over time Facebook developed a robust Ad program to help small businesses capture their local audiences. Many have turned to Facebook Ads when figuring out how to book more wedding photography clients because of their ease of use and targetability.

Get in touch with your old clients

Nevertheless, don’t forget about your old clients. Stay in touch with them and tell them what are your new projects, the new offers as well as discounts you have. It will make them return to you for their special events. Reaching out to old customers is really helpful as they are the easiest targets on your client list.

Consider the marketing platforms around you

There are a lot of photography marketing websites available now. Thus, you should make use of them at its best. Display your profile on top wedding photography sites like Canvera and reach a wider audience. It will increase your visibility and the chances of getting more leads. Search for similar marketing sites to make more people see you and talk about your work.

Give to Get with Charity Events

Getting involved in local charities has its own set of rewards, outside of what you get in return. However, with the right approach you can get both benefits: a chance to give back and get new clients!

When you volunteer your photography services for a charity event, you get the chance to reach a whole new audience that other photographers are likely ignoring.

The key to making this idea work is to ensure you will have the kind of visibility that gets attendee’s attention.

Simply having your logo printed in the event brochure won’t cut it. There needs to be guest interaction so people can experience your presence first hand. Otherwise, they may not remember you.

Suggest to the event coordinator some type of guest photo op, such as a pop-up photo booth with props and scenery. This will allow you to have meaningful interactions with guests and get your business card in their hands; not to mention, collect email addresses to which to send their photos.

If the event is looking for full coverage of the mingling, milestones and presentations, have a second shooter on hand to assist during times when you are interfacing with guests.

Finding Family Law Attorney In The City

How To Choose A Family Law Attorney Properly

Choosing the best attorney to handle your divorce, domestic violence, paternity or other family law matter can be one of the most important decisions in your life. It is important that you take the time to research your options and interview numerous attorneys to choose the proper fit for you. There are hundreds of divorce attorneys in New Mexico of varying backgrounds, skills and experience.

The very first consideration when searching for a divorce law firm and attorney is to find an attorney that you get along with, that you respect, and that listens to you. Attorneys by nature like to talk, but when you first meet an attorney their job should be to listen to your explanation of the facts involved in your case and to understand your goals and desires in the case. Divorce attorneys will only understand the likely or possible outcomes in your case if they listen to you. Over the years, we have had a significant number of potential clients call our firm that already have attorneys and they are looking to make a change.

The most common reasons clients want to hire a different attorney is because their attorney

  • doesn’t call them back;
  • doesn’t listen to them;
  • doesn’t work with them on the case. In our experience, the best divorce attorneys we have worked with on cases are the lawyers that listen to their client, understand their goals, advise their client about the proper direction to move forward in the case, but they must also have the ability to be aggressive when necessary.

Family law attorneys must have significant experience in order to properly handle a divorce or other family law case. This is not to say that an inexperienced attorney cannot successful complete a case; however, there is an extremely small likelihood that an inexperienced attorney will resolve your case with a result favorable to you, at an expected cost, within a reasonable time-frame. There is a practical reason that experience matters in a divorce case, which is the overall cost will be reduced by having an experienced attorney. This concept seems counter-intuitive since the more experienced attorneys often charge a higher hourly rate. The reason is because experienced attorneys already have a significant knowledge base concerning divorce law and procedures, which they do not need to spend time, and charge you, to research law. Attorneys charge a wide array of hourly fees for their services. Some attorneys will charge as low as $250 per hour, while other attorneys charge upwards of $400 per hour. We believe that the attorney’s rate should be reasonable considering their experience and efficiency.

What Should You Look for When Choosing a Family Law Attorney?

While divorce is the most common thing that comes to mind when people think of family law issues, there are actually many different legal matters that family law attorneys deal with on a regular basis. There are many attorneys in Michigan that claim to work on family-related law issues, which means you have a lot of choices. However, what kinds of things should you be looking for when choosing a family law attorney?

  • Experience – one of the first things you should look for is an attorney’s experience. As with most legal matters, experience is important. You want to be sure that the attorney you choose has already dealt with similar issues to what you’re going through and that he/she knows how to handle them properly.
  • Expertise – many attorneys set up a general practice where they take on several kinds of legal matters. However, if you’re dealing with a family law issue, then you don’t need an attorney who mainly focuses on personal injury and does family law on the side. Choosing a lawyer who is focused solely on family law issues can make a big difference in the outcome of your case.
  • Professionalism – you also want to make sure that your attorney appears to be professional and act in a professional manner. That means he/she speaks and behaves in an intelligent and courteous way.
  • Knowledgeable – the family law attorney you choose should be knowledgeable about family law. If he/she has a hard time answering your questions, then you might want to look elsewhere.

Reality and Honesty

An attorney who understands your goals but also reality is something you should heavily consider. One of the biggest red flags you can come across in your search is a “yes man.” An attorney should not be a magician nor should he or she promise you the world so that you are inevitably disappointed with the end result. No end result is ever completely perfect, and your attorney should be forthright with you regarding your case. A divorce attorney should be able to understand your goals and needs, but, should be honest and realistic with you about attaining those goals. Our attorneys will maintain candor and sincerity throughout your divorce and will advocate as hard as they can to achieve your goals.

A Counselor in Law, but also in Life

It is especially important to hire a lawyer who will understand both your wishes and needs. At the Mandel Law Firm, we will recognize that there are certain things that you need to be happy, and those are the things that we will fight the hardest to get. Additionally, our attorneys will provide the necessary comfort and understanding to any tough situation that you may face in the process toward a resolution. Our attorneys will not only counsel and explain the applicable laws, but, will act as “counselors in life” and aid you in starting a new chapter in your life. We are here with an empathetic ear as we strive to create a productive and comfortable environment where you will feel safe and secure. Our attorneys, while they each have different work styles, are compassionate listeners and will do their best to get you the best results.

A Firm Dedicated to Family Law and Versed in Your Specific Issues

The family law firm that you hire should be one that is experienced in a wide range of family law matters, not one that simply dabbles in the occasional family law case. Hiring a firm that specializes in family law will guarantee that you are in the best hands. Attorneys who have handled cases or unique issues just like your own will provide you with the greatest chances of attaining your goals as well as feeling comfortable throughout the process.

Professionalism and Reputation

Lawyers, above all, should be consummate professionals, keeping in mind all ethical guidelines. It can be difficult for you to know if the lawyer is a true professional in one meeting; but remember to check some basic things. Is there someone there to greet you? Are they prepared for your meeting? Are they giving you realistic outcomes and a full explanation of all your options? Beware of the lawyer who promises you a quick case or guarantees an outcome. It is a lawyer’s duty to manage your expectations and tell you the truth – even if they know it is not what you want to hear.

When it comes to their reputation, do not be afraid to do some homework on the lawyer. Check out their state bar history – have there been any disciplinary actions? If so, what were they about? How recent were they? Do other lawyers speak highly of them? Are there any reviews online about how they treat their clients? All of these would go to the professionalism of the attorney and can give you a good idea of how they would treat you during their representation.

When meeting with your attorney, remember that you are the client that will be paying the attorney; they will be the person helping you. Therefore, do not hesitate to ask some probing questions about their practice. Hiring a Family Law attorney is not cheap, but it can be a very smart investment – if you make the right choice. Do your homework and follow your instincts, and chances are you won’t go wrong.

Choosing an Attorney

Make a decision.

After meeting with the attorneys on your shortlist, you might know immediately who you want to hire. Or you may have to mull it over more. Regardless of how you immediately feel, give it a couple of days to think over (unless you need immediate legal assistance). You ultimately want to hire someone you trust and feel comfortable around. To help you make an informed decision, ask yourself the following questions:

  • How comfortable will you be working closely with this attorney?
  • Does the lawyer have the experience to handle the case?
  • Did the lawyer explain the case in a clear manner?
  • Does the fee seem reasonable?
  • What is your gut instinct telling you?
  • Was the lawyer easy to contact or difficult to get ahold of?

Call back.

Once you have settled on an attorney, you should contact him or her as soon as possible and state that you would like to hire them. Ask if the attorney needs any additional information and what the next steps are.

  • If there was something you didn’t like about the attorney, then see if he or she is willing to negotiate. For example, the lawyer might have a policy of only communicating by mail. However, if you would like status updates given by a phone call, then you should ask if the lawyer can change the policy for you.

Read the engagement letter.

The lawyer should present you with a formal engagement letter. This letter spells out all facets of the attorney-client relationship. You should read it closely before signing it and sending it back to the lawyer.

  • Be sure the fee agreement is included in the engagement letter and that it accurately reflects your agreement. If you agreed to a flat fee but you see a section discussing hourly billing, then you should bring this to the attorney’s attention and ask that it be corrected.
  • In fact, if you don’t understand something in the engagement letter, then you should ask the attorney before signing.
  • If something is inaccurate, do not scrawl over the page or cross something out. Instead, wait for a complete, accurate engagement letter to be sent to you. Then sign and return it.

Pay a retainer.

The lawyer may require that you advance a certain sum of money before he or she will begin working on the case. This is called the “retainer.” It is like a down-payment. There may be a separate retainer fee agreement or it could be part of the engagement letter.

  • Your lawyer should not use the retainer until they begin working on your case. However, once they have billed you for work performed, they can apply the retainer to your bill. You must pay whatever amount is not covered by the retainer.
  • If for some reason the lawyer stops working on your case before using all of the retainer, then you are entitled to a refund of the balance.
Posted inLegal