Free Printable Cleaning Checklist
If you are anything like me, my friend, I just bet you are a bit overwhelmed by your house. Clutter happens, and before we know it, stuff is taking over, and the dust just keeps piling up. I hear you loud and clear, and even more to the point, I’m with you! That’s why I put together this free printable cleaning checklist. It will help you stay organized as you clean your home room by room, top to bottom.
Let’s talk about how to create a cleaning routine. Personally, I find it most effective to clean room by room. I know some people tackle one task at a time and do the whole house. However, for those of us with short attention spans, this method seems to be the most effective. Taking each room one at a time keeps us focused and interested!
Let’s say you clean your floors then wipe your counter. Well, there’s a good chance there will be crumbs onto your newly-cleaned floors. No good. There’s no use in doing things twice! I hope that this list is effective at helping you tackle the toughest messes in your home. When you’re done, kick up your heels and enjoy a nice beverage of your choice.
Deep Print Head Cleaning
If print quality does not improve by the standard cleaning of the print head, clean the print head deeply. Cleaning the print head deeply consumes more ink than the standard cleaning of the print head, so clean the print head deeply only when necessary.
Make sure that the power is turned on.
Press the Setup button.
The (Setup) icon and “1” appear on the LCD.
Press the + button until “3” appears on the LCD.
Press the Black button or the Color button.
The printer starts cleaning the print head deeply.
The cleaning will be complete when the ON lamp lights after flashing.
Do not perform any other operations until the printer completes the deep cleaning of the print head. This takes about 3 minutes.
Check the print head condition.
To check the print head condition, print the nozzle check pattern.
The Ultimate Guide to Deep Cleaning the Toilet
As a Mom of two boys with terrible aim and poor toilet flushing abilities {this is seriously one of my biggest pet peeves!}, our toilets require frequent cleaning and disinfecting. Unfortunately, toilet cleaning involves much more than just swirling the toilet brush in the bowl with some cleaner, and often those areas on the outside of the toilet {and surrounding areas!} are the ones that are forgotten in our basic cleaning routines.
Cleaning the Toilet Bowl
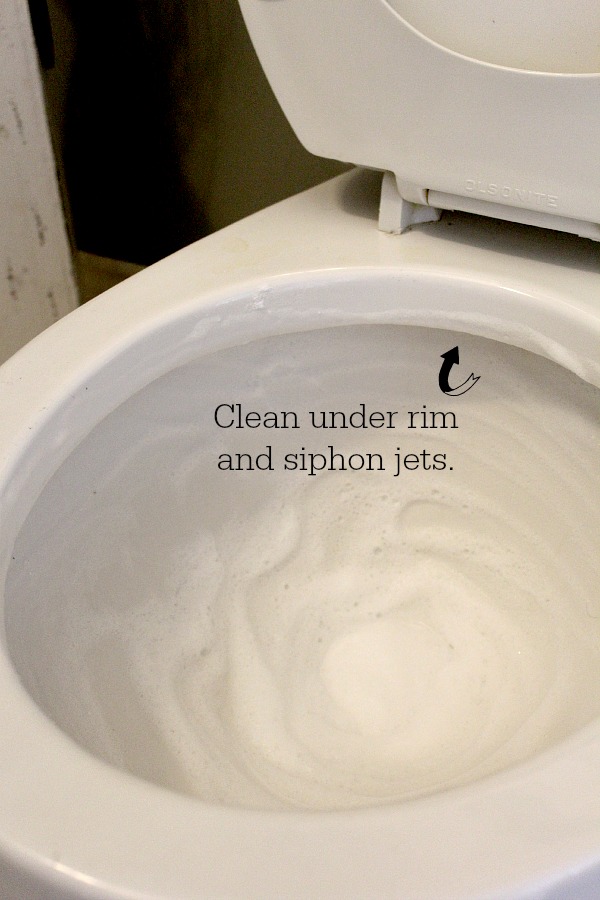
For the most part, I think we are all pretty good at swishing the toilet brush around in the toilet bowl. What we often miss; however, is cleaning the underside of the rim and the siphon jets {these are the holes underneath the rim where the water actually comes out}. If you are starting to notice vertical stains along the sides of your toilet bowl, this is a sign that they need to be cleaned. Often times, toilet brushes can’t quite get up into these spaces, and over time, grime builds up
To give your toilet bowl a real deep cleaning {without any harsh chemical cleaners}, pour some castille soap down the sides of the toilet and thoroughly scrub all areas of the bowl with a toilet brush. Next add about 1/4 – 1/2 cup of Borax along the sides of the toilet and use your toilet brush to bring up some of the soap mixture from the toilet bowl to form a thicker foam
This should by thick enough that it sticks to the sides of the toilet bowl rather than just sliding down into the water {just add a little more Borax if it is not thick enough}. Use a toothbrush to scrub away any grime around the rim and siphon jets. To get up a little further into the jets, soak a paper towel with the foam and place it around a metal hanger to really get up into the jets. If you are having trouble seeing these you can use a small mirror to get a better view. Allow the foam mixture to sit for 10-15 minutes, give it a final scrub, and flush.
Removing Mineral Build-Up
If you have hard water and significant mineral build up in your toilet that doesn’t come clean with the cleaning method above, you just need to add an additional cleaning step. Start by completely closing off the water supply to the toilet. Next you need to flush the toilet until the bowl no longer fills and then plunge out as much water as possible. If there is still water remaining, use an old towel to soak it up. Once the bowl is empty, add some cleaning vinegar {or regular white vinegar if this is all you have} to the bowl to completely cover any stains.
If your stains are more up underneath the rim or along the sides, soak a rag or paper towels in the vinegar and place over stain. Leave overnight and then scrub. If all stains are not removed, you can either repeat the process again or try the same method with a product containing hydrochloric acid {HCL}. Just be sure to follow the safety precautions on the product as this is a much stronger chemical. Also note that bleach SHOULD NOT be used on rust stains as it can actually cause the stain to set.
Genius Ways to Deep Clean Every Inch of Your Home
Be it a 1BHK, 2BHK, 3BHK or more, maintaining a clean and hygienic home is a must. Scrub your way into a clean and happy home with our tried and tested cleaning tips for every room. From cleaning chimneys to removing stains from sofas, our home-keeping tips will help you streamline your approach on how to clean house. Keep this handy guide as you work on your cleaning skills and check out our exhaustive list to be sure you don’t miss a spot!
How Often Should You Clean?
There are certain basic cleaning chores that need to be done daily, other things can be done weekly or monthly. Remember, not everything requires deep cleaning frequently.
Doing the dishes, wiping the kitchen counters, wiping bathroom surfaces and cleaning sinks and bowls acts as a daily chore. Whereas, cleaning microwaves, bedding, mirrors, computers and dusting furniture is a weekly activity. Furthermore, monthly cleaning includes clearing out your fridge, wiping light fixtures, blinds, fans and washing machines. Lastly, seasonal cleaning is done during a festival or work that requires plenty of effort such as, moving out furniture to clean. Here, we’ve sorted it out and made an easy checklist for you to follow.
What Should You Clean Everyday?
Here we learn that making your bed first thing in the morning is a productive way to start the day. Moving on to sorting clothes, every piece of clothing has a place of its own. So, make sure to return it to its place. Wiping surfaces regularly is an important task in order to avoid a layer of dust from accumulating. Keeping shoes outside the home prevents dirt from being dragged into the house. Subsequently, doing dishes immediately is better than doing a stinky pile at the end of the week
Have You Cleaned These Spots Yet?
These are spots that, regardless of how much you clean, still hold on to a layer of dirt. For example, door handles and knobs that are hotspots for bacteria. Or, remote controls that should be wipes with an alcohol-based disinfectant.
Cleaning following a confirmed or probable case of COVID-19
Guidance on cleaning a room that has been used by a confirmed or probable COVID-19 case, including cleaning products and the personal protective equipment that may be required.
General principles
Good hand hygiene is essential to minimise transmission of infectious droplets to yourself, others, and other surfaces.
Hands should be thoroughly washed with soap and water for at least 20 seconds, making sure you dry them thoroughly. If soap and water are not available and your hands are not visibly dirty, use hand sanitiser (containing at least 60 percent alcohol). Cover all surfaces of your hands and rub them together until they feel dry.
Avoid touching the face (eyes, nose or mouth) to reduce the likelihood of transmitting the virus from contaminated surfaces or items.
Always wear disposable gloves when cleaning. When finished, place used gloves in a rubbish bin, then wash your hands immediately.
When cleaning, remember the following two principles.
1. Top to bottom
Start cleaning surfaces higher up and work your way to the floor. This method ensures that any particulates or debris fall to the floor which will be cleaned last.
2. Clean to dirty
Start by cleaning surfaces and objects that are cleaner and work your way to cleaning dirtier items (eg, toilets).
Avoid going from an area that has not been cleaned to an area that has been cleaned. This avoids dirtying the cleaned area and will ensure you aren’t cross-contaminating items or surfaces.
Cleaning products
Coronaviruses can survive on surfaces for many hours but are readily inactivated by cleaning and disinfection. Any hospital grade detergent/disinfectant products are suitable for cleaning following a confirmed or probable case of COVID-19. Always follow the directions on the label. The label will include safety information and instructions for safe and effective use of the cleaning product, including precautions you should take when applying it. Specific personal protective equipment (PPE) and dwell time (how long the cleaning product should remain wet on the surface before drying) should be included in product instructions.
Perform hand hygiene then:
put on gown or apron
put on mask
put on protective eyewear (if the cleaning product manufacturer recommends eye protection, wear a face shield or goggles. Note that prescription eyeglasses are not classed as eye protection)
put on gloves (these can include heavy-duty household gloves).